とりあえずユーザー管理と認証を実装したいのでdeviseを使う
自力で実装する心の余裕が消えたのでdeviseを使うことにしました。
もうすでにあるものはガンガン使おう!そうしよう。
インストールや設定手順は下記リンクを参照しました。
- Rails 4.2 で ユーザー管理・認証 (devise) - Qiita
- Railsのログイン認証gemのDeviseのインストール方法 - Rails Webook
- [*Rails*] deviseの使い方 - Qiita
手順
Gemfileにdeviseを追加する。
gem 'devise'
bundle installを行う。
(ここではbundlerの設定をそのまま使用したいのでbundleコマンドを実行している)
$ bundle
Fetching gem metadata from https://rubygems.org/...........
Fetching version metadata from https://rubygems.org/...
Fetching dependency metadata from https://rubygems.org/..
Resolving dependencies...
Using rake 10.5.0
・・・略・・・
Using rack-test 0.6.3
Installing orm_adapter 0.5.0
Installing warden 1.2.6
Installing bcrypt 3.1.11 with native extensions
Using mail 2.6.3
・・・略・・・
Using web-console 2.3.0
Installing responders 2.1.1
Installing devise 3.5.6
Bundle complete! 16 Gemfile dependencies, 72 gems now installed.
Bundled gems are installed into ./vendor/bundle.
devise関連ファイルのをrailsコマンドで生成する。
$ bundle exec rails generate devise:install
      create  config/initializers/devise.rb
      create  config/locales/devise.en.yml
===============================================================================

Some setup you must do manually if you haven't yet:

  1. Ensure you have defined default url options in your environments files. Here
     is an example of default_url_options appropriate for a development environment
     in config/environments/development.rb:

       config.action_mailer.default_url_options = { host: 'localhost', port: 3000 }

     In production, :host should be set to the actual host of your application.

  2. Ensure you have defined root_url to *something* in your config/routes.rb.
     For example:

       root to: "home#index"

  3. Ensure you have flash messages in app/views/layouts/application.html.erb.
     For example:

       <p class="notice"><%= notice %></p>
       <p class="alert"><%= alert %></p>

  4. If you are deploying on Heroku with Rails 3.2 only, you may want to set:

       config.assets.initialize_on_precompile = false

     On config/application.rb forcing your application to not access the DB
     or load models when precompiling your assets.

  5. You can copy Devise views (for customization) to your app by running:

       rails g devise:views

===============================================================================
環境を設定する。
config/environments/development.rb に下記を追記する。
config.action_mailer.default_url_options = { host: 'localhost', port: 3000 }
devise用のUserモデルを作成する。
$ bundle exec rails g devise User
      invoke  active_record
      create    db/migrate/20160321071935_devise_create_users.rb
      create    app/models/user.rb
      invoke    rspec
      create      spec/models/user_spec.rb
      insert    app/models/user.rb
       route  devise_for :users
Userテーブルを追加するのでmigrateする。
$ bundle exec rake db:migrate:reset
== 20160321071935 DeviseCreateUsers: migrating ================================
-- create_table(:users)
   -> 0.0166s
-- add_index(:users, :email, {:unique=>true})
   -> 0.0333s
-- add_index(:users, :reset_password_token, {:unique=>true})
   -> 0.0259s
== 20160321071935 DeviseCreateUsers: migrated (0.0760s) =======================
deviseが出力するメッセージの表示場所を設定する。
(ここでは app/views/layouts/application.html.erb に設定)
ついでにナビゲーションバーにログインしていない場合はログイン、ログイン済みの場合はログアウトというリンクを表示する。
<body>
  <header>
    <div class="">
      <% if user_signed_in? %>
        <div>
          Logged in as <strong><%= current_user.email %></strong>.
          <%= link_to "ログアウト", destroy_user_session_path, method: :delete %>
        </div>
      <% else %>
        <div>
          <%= link_to "ログイン", new_user_session_path %>
        </div>
      <% end %>

    </div>
  </header>

  <div>
    <p class="notice"><%= notice %></p>
    <p class="alert"><%= alert %></p>
    <%= yield %>
  </div>

</body>
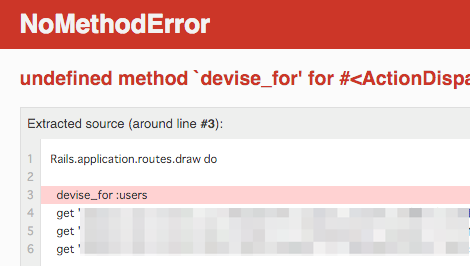
undefined method `devise_for'というエラーが出た。

→一度rails serverを再起動しないといけないらしい。
undefined method `devise_for' in rails - Stack Overflow
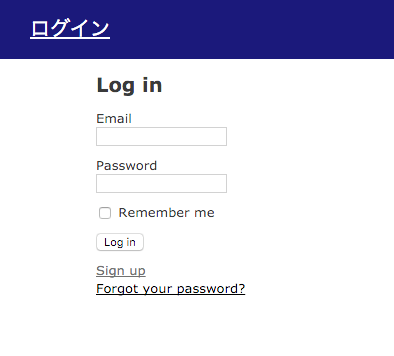
正しく動けば以下のようなログイン画面が表示されるはず。

その他
ログインしていないユーザーはログイン画面にリダイレクトするよう設定したかったので下記を参考に実装。
devise + omniauth-facebookでリクエストURLにリダイレクトする - yasuoza diary
初期ユーザーの追加をする。
Devise に初期ユーザを追加 - Ruby and Rails

Ruby on Rails 4 アプリケーションプログラミング
- 作者: 山田祥寛
- 出版社/メーカー: 技術評論社
- 発売日: 2014/04/11
- メディア: 大型本
- この商品を含むブログ (5件) を見る